How to Tile a Curved Feature Wall Properly
A curved feature wall should feel intentional from every angle. When the tile follows the radius cleanly, joints remain disciplined and the finish catches light beautifully, it can transform an ordinary bathroom, entry or hospitality space into a genuine design statement. Learning how to tile a curved feature wall starts with one principle: the curve must be built, prepared and measured with the same precision as the tilework itself.
Curves are unforgiving. On a flat wall, a minor variation can disappear into the wider surface. Around a radius, it becomes visible as lipping, wandering joints, uneven cuts or tiles that appear to pull away at the edges. The result depends less on rushing the installation and more on disciplined preparation, considered material selection and a setting-out plan that respects the geometry of the wall.
Start with a stable, true curved substrate
Tile is the finishing layer, not the material that corrects an uneven wall. Before adhesive is mixed, inspect the substrate for movement, hollows, high points and inconsistencies in the radius. A curved wall may be formed in masonry, rendered blockwork, bendable plasterboard systems or purpose-built framing, but every construction type needs to be rigid, dry and suitable for the intended tile weight.
The curve should be checked repeatedly with a flexible straightedge, templating strip or purpose-made radius gauge. This establishes whether the wall holds a consistent sweep from floor to ceiling. A gentle curve with a few millimetres of variation may still look acceptable before tiling; once reflective or small-format tiles are installed, that variation can become the focal point for the wrong reason.
Where correction is needed, use a compatible levelling or render system to refine the surface. In wet areas, preparation also includes the correct waterproofing system, applied over a properly prepared substrate and carried through all relevant junctions. Waterproofing protects the structure; careful surface preparation protects the visual outcome. Both matter.
Allow all preparation materials to cure in line with their technical requirements. Tiling over green render, uncured waterproofing or a damp substrate can compromise bond strength and create avoidable delays later in the project.
Choose tiles that suit the radius
The tighter the curve, the more carefully the tile needs to be selected. Small mosaics naturally follow a radius because their individual pieces and flexible backing can accommodate the change in direction. Narrow kit-kat tiles, fingers, small-format squares and certain handmade-look ceramics can also work beautifully, especially where the wall is designed as a tactile, detailed feature.
Large-format tiles are possible on broad curves, but they demand a generous radius, careful cutting and exceptional substrate accuracy. They are rarely the most forgiving option. A large tile that bridges a slight hollow may create lipping, while a forced tile can introduce stress that affects the bond or the finished alignment.
Consider the finish as well as the format. Gloss tiles amplify light and can make an elegant curve feel sculptural, but they reveal imperfections more readily. Matt, textured and natural stone-look surfaces can be more forgiving visually, though textured faces may require more attention when grouting and cleaning. If natural stone is specified, confirm that it is appropriate for the location and that the adhesive, grout and sealing approach are compatible.
Mosaic sheets deserve a particular note. They make curved work achievable, but sheet-mounted mosaics are not automatically easy. Mesh thickness, sheet alignment and inconsistent spacing can show up quickly on a radius. Premium installation often means cutting sheets into smaller sections where needed, rather than trying to press a full sheet around the wall and hoping the joints remain even.
Match adhesive to the surface and tile
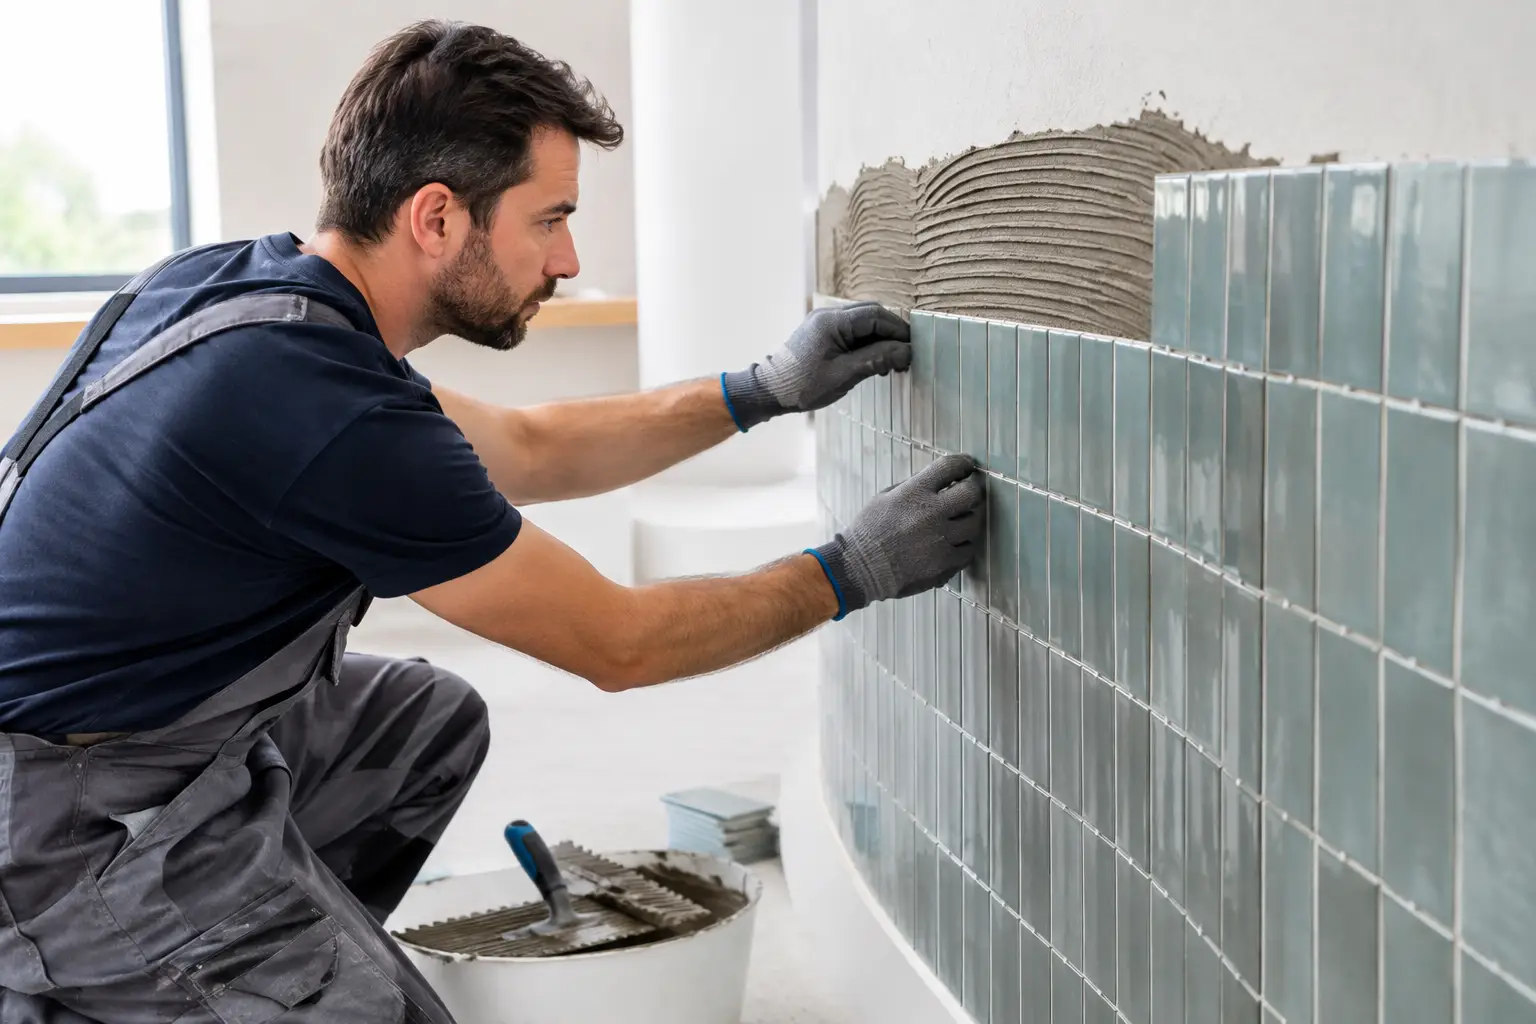
A high-quality, flexible adhesive appropriate to the substrate, tile type and environment is essential. The goal is consistent support across the back of each tile without excessive adhesive build-up that distorts the face of the installation. On demanding curves, the adhesive needs enough working time for adjustment while holding tiles securely in position.
For larger tiles, full coverage is particularly important. Directional trowelling and, where required, back-buttering help remove voids. This is not merely a technical preference. Unsupported areas can lead to drummy tiles, cracking under impact and a finish that does not stand the test of daily use.
How to tile a curved feature wall with accurate setting out
Setting out is where a curved wall either becomes refined or starts to unravel. Establish the centreline or main visual axis first. This could be the middle of an alcove, the centre of a vanity, a mirror line, a doorway or a deliberately positioned vertical grout joint. The right starting point depends on what will be seen most clearly when the room is complete.
Dry-lay a section of tile wherever possible. This reveals how the tile modules behave across the curve and where cuts will land at returns, ceilings, floors and adjacent walls. Avoid narrow slivers at highly visible edges. A slight adjustment to the starting point can often produce more balanced cuts on both sides.
On a convex curve, tiles fan outward as they travel across the face. On a concave curve, they close in. With rectangular tiles, this can affect joint spacing and the apparent straightness of the rows. A stacked layout may suit one curve, while a vertical orientation or mosaic format may better suit another. There is no universal pattern that works for every radius.
Use level reference lines, but do not assume that a straight horizontal line on the substrate will guarantee a visually straight line once it wraps around a curve. Stand back regularly and assess the installation from the room’s main viewing positions. This is especially critical with linear tiles, where a minor drift can become obvious over several rows.
Work in controlled sections
A curved feature wall is best tiled in manageable areas, allowing regular checks for level, alignment and surface consistency. Starting from a firm ledger or well-established base line prevents the weight of fresh tiles from causing subtle movement below.
Apply adhesive only to an area that can be tiled within its open time. Press each tile into place with a slight sliding motion to collapse the adhesive ridges, then check for coverage and alignment. Spacers and levelling systems can assist, but neither replaces an installer’s judgement. On small mosaics, excessive pressure can squeeze adhesive into joints and create substantial cleaning work before grouting.
Maintain movement joints at changes of plane, perimeter edges and any locations required by the substrate or project conditions. These joints are generally finished with a suitable flexible sealant rather than rigid grout. It is a discreet detail, yet it allows the tiled surface to respond to normal building movement without cracking at the most vulnerable points.
Cut edges and terminations deserve equal attention
A tiled curve is judged by its edges as much as its centre. Decide early how the wall will terminate at an external corner, recessed niche, ceiling line or adjoining finish. Depending on the design, this may involve a mitred edge, a colour-matched trim, a metal profile or a tile return.
Mitres can create a particularly crisp, monolithic look, but they require accurate cutting, suitable tile material and careful handling. Some porcelain tiles are well suited to mitring; brittle ceramics, heavily textured products and certain glazed finishes may be better served by a trim profile. The most elegant detail is not always the least visible one – it is the one that remains clean, durable and proportionate to the room.
Where a curve meets a flat wall, plan the transition before installation begins. A sudden change in joint width or an unplanned partial tile at the junction can interrupt an otherwise exceptional surface. Templates are often worthwhile for complex returns, especially when the wall includes joinery, stone benchtops, mirrors or custom lighting.
Grout and finishing make the curve read correctly
Grout colour changes the visual character of a curved wall. A close colour match allows the tile surface to read as one continuous form, ideal for a calm and architectural result. A contrasting grout highlights every unit and can turn the curve into a graphic feature. Neither approach is inherently better, but contrast leaves far less room for inconsistency in joint width or alignment.
Once the adhesive has cured, grout the wall methodically, working it fully into the joints without leaving residue in textured surfaces. Clean in stages and avoid over-washing, which can weaken or discolour fresh grout. Finish perimeter and change-of-plane joints with neat, colour-coordinated flexible sealant after the grout has cured as required.
The final inspection should happen under the lighting the space will actually use. Raking light from wall sconces, downlights or a nearby window can reveal issues that are not obvious under temporary site lighting. Check the curve from close range, across the room and from the natural approach to the space. High-end tiling is not simply about whether the tiles are attached. It is about whether every line, edge and reflection supports the original design intent.
For a small-radius wall, premium materials or a highly visible focal point, specialist installation is usually a sensible investment. Perfectly Laid approaches curved tiling as a complete finish system – from substrate correction and waterproofing through to precision setting out, grouting and caulking. The lasting beauty of a curved wall comes from those quiet decisions made before the first tile is fixed.